Tuesday, July 31, 2012

Painted Canvas - Abstract Art


I have had an extra canvas I've been waiting to do something with ever since I made the melted crayon painting. The canvases came together in a two pack and I have been wondering what I could do with them.  My fiancé and I were able to decide on a project we could do together. I love it when he does arts and crafts with me. It doesn't happy very often...

Anyway, he liked the idea of painting the canvas with bright colors with random shapes to add some color to the bedroom. To start this project, we used masking tape to create lines and shapes on the canvas.


Once we both agreed we liked how it looked, we started painting. We used two or more coats of paint in each section until he was happy with how it looked. My fiancé  can be even more of a perfectionist that I am!


Once the paint dried, we peeled the masking tape off to reveal the blank, unpainted canvas beneath. I like how it makes the colors stand out more on their own with a bit of a white border around it.We both like how it looks and it brings a lot of color into the room. Now to find or make a few more things to go on the walls...


Saturday, July 28, 2012

Flower Pens

I have a deep and abiding love for flower pens. They are just so happy and fun! Throughout college I used them whenever I could. I figured if I had to take notes, I might as well take notes using a pen I absolutely adored. Personally, I like to make flower pens with a smaller size flower instead of a larger one because it makes it easier to write with, (and less obnoxious when in class...).

I had a bunch of purple and teal flowers that were leftover decorations from my engagement party last weekend that had just been sitting on the dining room table all week...I figured why not turn them into something where I will continue to use and look at them!

Flower pens are super easy to make - and at least to me they are mildly addicting to make because they are so easy!

Supplies: Silk flowers, pens, wire cutters, floral tape, and  baby powder

The first step is to use the wire cutters to cut the stem of the flower so it is shorter than the pen. Some people like to cut the length so that it is nearly as long as the pen, but I prefer to cut the length to be about half of the pen.

Now start wrapping the floral tape around the pen and stem of the flower, securing the flower to the pen.

Once you are done wrapping the pen, cut the floral tape off of the roll. Your pen is probably all sticky (which is gross) right now. To get rid of the stickiness, rub a small amount or baby powder onto the pen. Now only does this get rid of the stickiness of the pen is also makes it smell...fresh? 

But you now have a delightful way to take notes, jot down a grocery list, or do whatever with! Flower pens can also make a great gift. If you make several then put it in a small flower pot filled with beans it looks pretty and it is functional!

I keep all of my pens in a flower pot. As you can see, I already had a few flower pens. I didn't need more, but they are so fun and so easy to make! I just can't help myself!


Thursday, July 26, 2012

Cinnamon-Nutmeg Muffins


I found an absolutely wonderful muffin recipe. Here is the link to the original post, from a blog called Velvet Lava. I did make two minor adjustments to the recipe, but I cannot take credit for this delicious goodness. 

1/3 c. melted butter
1/2 c. brown sugar
1 egg (preferably room temperature)
1 1/2 c. all purpose flour
1 1/2 tsp. baking powder
1/2 tsp. salt
1/4 tsp. nutmeg
1/2 c. milk

Topping (option: cut topping in half*)
1/4 c. brown sugar
1/4 c. melted butter
1/2 tsp. cinnamon

Preheat oven to 350F.


In a mixing bowl, sift together all the dry ingredients. Add the wet ingredients and stir until mixed, but leave it so it is still a bit lumpy - avoid the urge to over mix (I make this mistake all the time with recipes).Scoop the batter into greased muffin tins. I get 9 muffins. Bake for 20-25 minutes. 

Muffins before the delicious topping were added. 


To make the topping, mix the brown sugar and cinnamon together in a small bowl. The melted butter will go in another bowl. When the muffins are still warm, dip the muffin in the melted butter, then roll in in the brown sugar and cinnamon. 


They fit perfectly into my Tupperware! Awesome ! Perfectly packed to take one to work . 
These ridiculously delicious muffins taste best fresh out of the oven, but they hold up well the following day. Just make sure you store them in an air-tight container. 

We made a second batch when we had some overnight guests to serve as a delicious breakfast surprise and they went quickly - which I hope means they all thought they were as amazing as my fiancé and I think they are!

Tuesday, July 24, 2012

Make your own envelopes!


As kids, my little sister and I loved to play "Mail." We would construct mailboxes for ourselves and then we would write little notes to each other on small pieces of paper. We would fold up these little notes and then put them into little envelopes we made. I wish I had pictures of these because I'm sure they were pretty cute. We had a designated post office, and periodically one of us would act as the mail carrier and deliver the mail to the correct person.

I hadn't thought about that game in years, and the memories of it make me smile. With that in mind, I thought I would once again try my hand at making envelopes and mailing a letter to my favorite little sister. Don't worry, I only have one little sister (although she is taller than me now...does that make ME the "little" sister?!?)

 For this project you need scrapbook paper, an envelope to use as a template, scissors, and a glue stick. I decided to pick a variety of pink scrapbook paper for my first round of envelope making. 

The first step is to unfold your envelope. My envelope did rip a little bit as I pulled where the envelope had been glued together, however, that did not affect anything.
The next step is to trace the unfolded envelope, which is now your template, on the back side of the scrapbook paper. I then cut through the stack of paper all at once. When you complete this step you will have a small pile of weirdly shaped pieces of paper...

All that is left to do is fold and glue!

If using patterned paper, be aware of which way it is facing before you cut it...the other envelopes turned out fine, but I did not intend for the hearts to be upside-down and diagonal...silly me!
These were so easy and fun to make I actually made several more...Now to figure out what to do with all of these envelopes! 


Thursday, July 19, 2012

Hand-Dyed Cupcake Liners

I love cupcake liners. I love those little pieces of cup shaped paper because they are fun and somehow adorable. It's easy to use them to incorporate a theme into your baking. I love to buy them in all sorts of different colors and patterns. Usually, I just end up going for the same-old package of pastels because they cost the least.

I had a stack of liners that have been in the pantry for awhile. They had been ignored and overlooked in favor of my stash of more exciting polka-dot liners, or more vibrant colors. I also have some dinosaurs cupcake liners and cupcake toppers that I am saving for the right occasion. I've held on to them for well over a year now because the time was never right for dinosaur cupcakes....maybe one day soon.

Anyway, I decided that it was time to give my basic pastel cupcake liners a little love.

This project was really easy. All you need are cupcake liners that need a little excitement in their lives, food coloring, water, a bowl for each color you want to use, and somewhere to place the cupcake liners when they dry. I spread out a few sheets of paper towels to put mine on.

In each bowl, I put 3 tablespoons of water, and about 6 drops of food coloring. Then, I dipped the top of the cupcake liners in the bowl until I thought they had absorbed enough. I left them bottom-side up on a paper towel to dry.


The pink and the blue liners keep photographing as white liners...but I assure you they are pink and blue. The yellow is still very obviously yellow.  
These are giving me the urge to bake right now! But since this is Indiana in the middle of a drought, and  it has been in the 90's nearly every day since...forever, I think I'll hold off on baking in the apartment. 
Steve, one of my kitties, was interested in what I was doing. He kept trying to take a peek to see what was going on.  While the cupcake liners were drying he actually hopped onto the counter (which is a forbidden space for the cats) to try and check them out. 

Next time I have white cupcake liners, I could do all sorts of colors! This time I stuck with pink, blue, and yellow - the same color as my liners.
Steve, it's nothing tasty that you can try and beg for! Just paper and water!

T-Shirt Yarn Crocheted Rug


Nothing makes you more aware of how dirty your kitchen floor
 is as when you are trying to photograph it.

Last Saturday I posted a tutorial for t-shirt yarn. Well, I've made something with it! I crocheted an oval rug for the kitchen. And yes, I realize that my oval isn't exactly the right shape. I'll just claim it gives the rug character....

It is thicker and sturdier than I expected it to be, and also not as soft as I thought it would be. But it is nice to stand on when at the sink doing dishes instead of standing on the bare tile floor.

I think it would also be fun to make a basket out of the t-shirt yarn. I feel like it would be sturdy enough to hold its shape. A project for another day. :)

Since this post is super short, I'll leave you with my favorite joke of all time. It's not a good joke at all, but I love it regardless. I found it on a laffy-taffy wrapper when I was in high school.

Q: What did the fish say when it ran into a wall?
A: Dam!

Tuesday, July 17, 2012

Granola Bites


The last few weeks I have been perfecting a recipe for homemade granola bars. My fiancé and I love granola bars (although I think he likes them more than I do) and they make a good mid-work-day snack. We wanted to make our own because it is healthier. We can control what goes in to in. No preservatives or high fructose corn syrup. Another added plus, they cost less. I'm not sure by how much, we haven't done the math, but it is definitively cheaper. 


This recipe is somewhat reminiscent of a no-bake cookie in that no baking is actually involved. What I like about this recipe is that it is super easy to customize and change things around. I feel like nearly any ingredient can be interchanged with another. 


Here is the basic recipe:
-2 cups oats
-1/2 cup peanut butter
-1/2 cup honey
-2 teaspoons vanilla extract
-Optional ingredients: nuts, dried fruit, a tablespoon of Nutella, sunflower seeds...you can add just about anything that you think will taste yummy! 


In a saucepan over low heat, combine the peanut butter, honey and vanilla until the mixture has a nice creamy consistency and everything is well mixed. Take off of the heat and stir in the oats and any of the optional ingredients. If you decide to use Nutella, add it to the sauce pan when everything is being heated. Once everything is stirred in, press into mini muffin cups and let cool. 


The recipe as it is above makes for a moister granola bite than I prefer, but it is how my fiancé enjoys them. If I were making them for just me I would reduce the amount of either peanut butter or honey to 1/4 cup, depending on what I want the predominate flavor to be. Or I reduce both of them. If it is made too dry, however, all the ingredients won't stick together once removed from the mini muffin cups. 


Sometimes, instead of two cups of oats, I use one cup and add in a cup of shredded wheat as well. It gives it a crunchier texture. Make sure to break up the shredded wheat into small bits. I use a blender to do this (because I don't have a food processor).

You can also spread the mixture onto a baking sheet so it is shaped more like a granola bar, whatever your personal preference is. It works both ways. We prefer to use the muffin cup shape because it is easier to portion.

\
I hope you enjoy this easy and delicious recipe. :)
Hey! Who took a bite out of my granola bite?!?! Oh wait, I did. 

Saturday, July 14, 2012

T-Shirt Yarn


Did you know...you can make a continuous strand of "yarn" from a t-shirt? And it's fairly simple to make! All you need is a pair of scissors a t-shirt, and a ruler (if you want to be precise with your measurements).

Before you start snipping away at your collection of t-shirts, first make sure that the shirt you want to use does not have a seam down the sides. You want to use shirts that are one continuous tube around the middle.

Lay your t-shirt down on a flat surface and cut just below the armpits, or just below the line of printing on the shirt, all the way across the shirt. You will get a tube that looks something like this:

Next, you want to start cutting the t-shirt tube into about 1 inch strips, stopping one inch from the end of the shirt. Don't worry if your lines aren't perfectly straight, it doesn't matter if there is a little wiggle when you cut. Once you complete this step it should look something similar to this:

Next step is to snip at the top  where you left the one inch margin. If you refer to the picture below, you can see that you cut diagonally across the top to separate the strips yet still keeping the whole thing intact and in one piece. It's hard for me to put into words, which is why I have a nifty picture. You need to cut where the red lines are.
I used MS Paint to create this masterpiece...if only I were actually capable of creating parallel lines.
But the picture gets the job done!

If everything has gone well, you should now have one continuous strip. The next step is to stretch out the material. Starting with one of the ends, stretch it out, about a foot or two at a time. The fabric will start to curl in on itself, like the picture below. 

As you can see, at this point I still had a bit of a way to go, so Gizmo decided to help.

Now all that is left is to form it into a ball so it doesn't become a tangled mess! I created several balls of t-shirt yarn from old t-shirts. Now I need to make something out of them. This project is super easy to complete, you are recycling materials, and freeing up space in your dresser. 

Thursday, July 12, 2012

Melted Crayon Painting

The melted crayon paintings have been all over Pinterest for quite some time. I actually made this way back in January. I knew I wanted to do a melted crayon painting, but I wanted it to be something more fun and personal. This was supposed to be a birthday present for my fiancé, but I was so excited about it he ended up getting it super early. 

To make one of these, you need a box of crayons, craft glue, a canvas, wax paper, masking or painters tape, a hair dryer and some newspaper to protect the surrounding area (the crayon tends to splatter). 

Glue the crayons to the top of the canvas in whatever order and color combination you prefer. Make sure that the tips of the crayons are pointing down. While the glue was drying, I got on the computer and played with different fonts until I found one I liked. I printed it on regular printer paper. It took me two tries to get everything sized correctly. 

I got out the wax paper, and traced the letters onto the wax paper. Then, I took masking tape and taped over the letters. I flipped the taped over wax paper over, so I could see the letters I had traced, and cut them out. Then I pulled the wax paper off of the tape, and stuck the tape in the shape of the letters onto the canvas.

By this time, the glue was dry. I propped the canvas against the wall, with newspaper behind and underneath the canvas to catch all the the splattered drops of melted crayons wax. I turned on my hair dryer and watched as the crayons melted and dripped down the canvas. It was a lot of fun to watch. Once I was sure the crayon wax had dried, I carefully peeled off the tape, I did have a little accident with the "T," but otherwise it was perfect! With a little bit of white paint the edges were neatened up. The letters seem to pop right off the canvas. 


This is before it was touched up with the white paint. Maybe if I had used painters tape instead of masking tape the paint wouldn't have been necessary, but I used what was on hand. 


Tuesday, July 10, 2012

Yarn Wrapped Lampshade


See the big rip?
 It's hard not to see it!
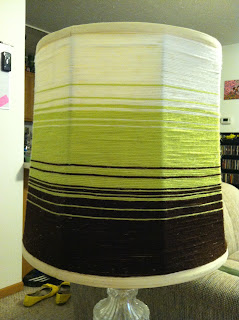
My fiancé and I had this lampshade with a big rip. On Pinterest, I found a tutorial for a yarn ombre lampshade. It looked like a perfect project to revive this poor ripped lampshade and to use up some yarn from my massive stockpile (we actually bought the green because none of the shades of green yarn I had were quite right, but the brown and white I already had). I had a bit of a struggle following the tutorial as stated. It might have to do with the fact that the tutorial used a circular lampshade and the one I have is a hexagon.

 I started off by gluing the strand of brown to one of the sides of the lampshade with my hot glue gun. Then, you wrap the yarn around and around and around...you get the idea. As I wrapped around I periodically glued the yarn to the lampshade. I found that the further along I went with this project the less glue I used per round. I have no specific formula for how I did this - when it seemed like the yarn need to be secured I put a dot of glue on the lampshade and pressed the yarn into it. Sometimes I went back and added more glue if I thought it was needed in certain spots. Make sure you keep the yarn fairly taut, but don't stretch it too tight. 

My fiancé wanted each color to be about a third of the lamp. He even got out a ruler and marked off the lampshade into thirds. A few inches below the first mark I started adding in the green. I did not cut off the brown, because I still wanted to use it so when I was using the green, I kept the brown inside of the lampshade so it was out of the way, and vice-versa when using the brown. I did the same exact thing once I started using the white yarn. 


In the picture to the right, I have just one row of white yarn completed. This is the side with the rip and it is barely visible anymore! Just the very top of it is left to cover. When I still had two colors of yarn attached, the color that I wasn't currently using went behind the other one as it wrapped around the lampshade. I don't think this was the best way to do it. When the lamp is off you can't tell that there is a string behind the outer layer, but when it is turned on the yarn is clearly highlighted. If I ever do this again, I think I'll just cut the strand if I'm moving on to a different color, and glue it back on if I start with that color again. I think it would look better. But that side can be turned so that people don't look at it. The other five sides look great.

Overall, I am very happy with the finished product, and my  fiancé  is impressed. It was an easy project, and only cost a few dollars to complete. There are a few imperfections here and there, but nothing to the point where I feel like I needed to go back and fix. 
The finished lampshade! (Pay no attention to the ragged
 cat tower in the background...one of the cats really
loves it and expresses his love by scratching it to bits. But
 it has saved the furniture so I shouldn't complain!)